Robopedia, Guides & Tips collected by the Community
Farming Guide & Routes
To farm Botworld efficiently, you will need:
- Good recruits: efficient farming is your Recruits doing the fighting, while you loot piles and chests.
- Good routes: different places drop gold at varying amounts, and offer a different selection of Rare Materials
- Good area knowledge: As you get to know the precise spawn location of every potential loot and mob for a given area, your performance there will significantly improve. Especially if your recruits are somewhat lacking
This guide is focused on farming scrap, but you will find tips & techniques for critters & items in our Events Guide
Example:
I don’t think you should feel the need to dedicate yourself to farming before lvl 15 at the earliest. I started researching it when I was around lvl 17 myself, and it had been pretty easy to upgrade my main bots just doing the story, contracts & arena.
- Build up your Recruits
- Basic Farming Tips
- Route Navigation & Recruit Micro-Managment
- Best Routes for every Resource
- Other Routes
Build up your Recruits
- Learn everything about Recruits and how to build them good Comps they’ll handle respectably
- Since you don’t want to fight yourself while farming, don’t hesitate to give them all your best bots
- Mobs level increases with yours! Read Mobs Level Scaling, and make sure not to let your Recruits fall too much behind your own level
- If you’re missing good-enough bots, best give up on of your recruits and use it as a decoy, than to have them all be mediocre.
Basic Farming Tips
Relevant Business Upgrades
Farming-relevant Business Upgrades
Extra Canisters
Check out the far right of the Shop (behind ads if you don’t have the Mayoral Membership).
Farming Contracts
A few contracts are not based upon a specific location and can be completed while running most routes:
- Loot X chests / piles
- Fight X bandits / Wild bots
- Disarm X mines
You can cancel and reroll contracts that don’t fit. It can’t be worth your time if you don’t have the Mayoral Membership that allows you to skip ads though, and even then I don’t do it anymore because it’s very tedious.
Route Navigation & Recruit Micro-Managment
- In most routes, you want to make sure your recruits can deal with the mobs that guard loot or block your way, while the rest is only optional. This may require some micro-management, usually by not deploying all 3 of them right from the start but keeping them to where they’re the most needed.
- Use the Bombardment gadget (lvl2) on large groups to help your recruits win fights easier and save up health (thx @birdsound#0152)
- Tank the energy canons so it doesn’t hurt your recruits instead.
- Be very careful for them around mines. Still, if you have such contracts, pick and chose a route that will allow you to complete it.
Young botmasters
At the early stages of the game, you will be both limited in your route options, and probably not have that great Recruits. You can still use these techniques, and will have to make up for your Recruits shortcomings with some extra micro-management and running to dodge mobs. Those you can’t run, fight many at once.
The loss of gold/min will be made up for by the opportunity to train any bot you want to improve.
Invisibility is a huge help, just as much as the third recruit.
This route is rich in gold, Evader Sprays and Splasher Explosives so you should be able to get a 2nd suitable recruit very soon with upgraded Evaders and Splashers.
Video demo of farming Cobblestone + River Run + Southbank with only 1 weak/average recruit:
Best Routes for every Resource
If you haven’t yet, you should read this guide from the top of the page.
Mats are Gold
You will always be looking for gold, but when you also need specifically some other materials it might be worth it to run an alternative route to have a chance to drop it. At 475 gold/rare drop, and ~1 drop/3runs (7min30), it represents about 63 extra gold/min. Even just Sparky Wires make it worth it to have Wild Bots in your route, even if that decreases your gold earnings. It’s all about compromise.
Summary Table
Here are my best routes for Resources I deem “Farmable”:
| Resource | Cobblestone Trail | Reef+Bay | Monument+Fissure | Redleaf Ridge |
|---|---|---|---|---|
| Gold/min | 35 | 38 | 26 | 24 |
| Gold/can | 73 | 109 | 70 | 62 |
| Evader Spray | Lots | Lots | ||
| Splasher Explosives | Lots | Lots | Some | Lots |
| Tank Plating | Some | Lots | ||
| Chaser Core | Some | |||
| Dull Steel | Lots | Lots | Lots | Lots |
| Glass Tube | Lots | Lots | Some | Some |
| Hard Botplates | Some | Some | ||
| Heavy Steel | Some | |||
| Sticky Goo | Lots | Lots | Some | Lots |
| Clear Oil | Lots | Lots | Some | Some |
| Double Cog | Lots | Lots | Lots | Lots |
| Rusty Cog | Lots | Lots | ||
| Sparky Wires | Some | Some | ||
| Thick Tube | Some | Lots | ||
| Routes: | Cobblestone Trail | Reef+Bay | Monument+Fissure | Redleaf Ridge |
Special
Pretty sure there’s a good farming route for it all in Spore Wood… to be researched
Not Farmable
Botframes: Read the section about Finding Botframes.
Not saying they can’t be found, but I don’t see a way to reliably get to a satisfying drop rate per minute for the following:
Cold Battery, Frost Fuel, Hardened Fiberglass, Sputtering Generator, Jet Fuel, Matte Coating, Tangled Wires, Sniper Gyro, Support Chip
I suggest you take every opportunity you get to collect them by other means (Shop & Recruit Jobs).
What makes a good farming route
- Can drop the type of Materials you’re looking for
- Can be completed by your Recruits while fighting as little possible yourself (the goal is 0)
- Doesn’t make you run around too much
Experience shows that the best routes are around 2-4 min/run, so if you’re running for much longer consider trimming it down.
Keep it short, make bank !
A good route will have a high density of Piles and Chests, have the desired characteristics for the Materials you’re looking for, and usually have more Bandits than Wild Bots since they drop Gold.
Cobblestone Trail
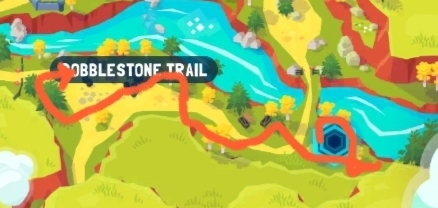
- Trees, Water, Bandits
- Drops: Evader, Splasher
73 gold/can, 35 gold/min, 2 min/run
Perillous Reef + Mangrove Bay
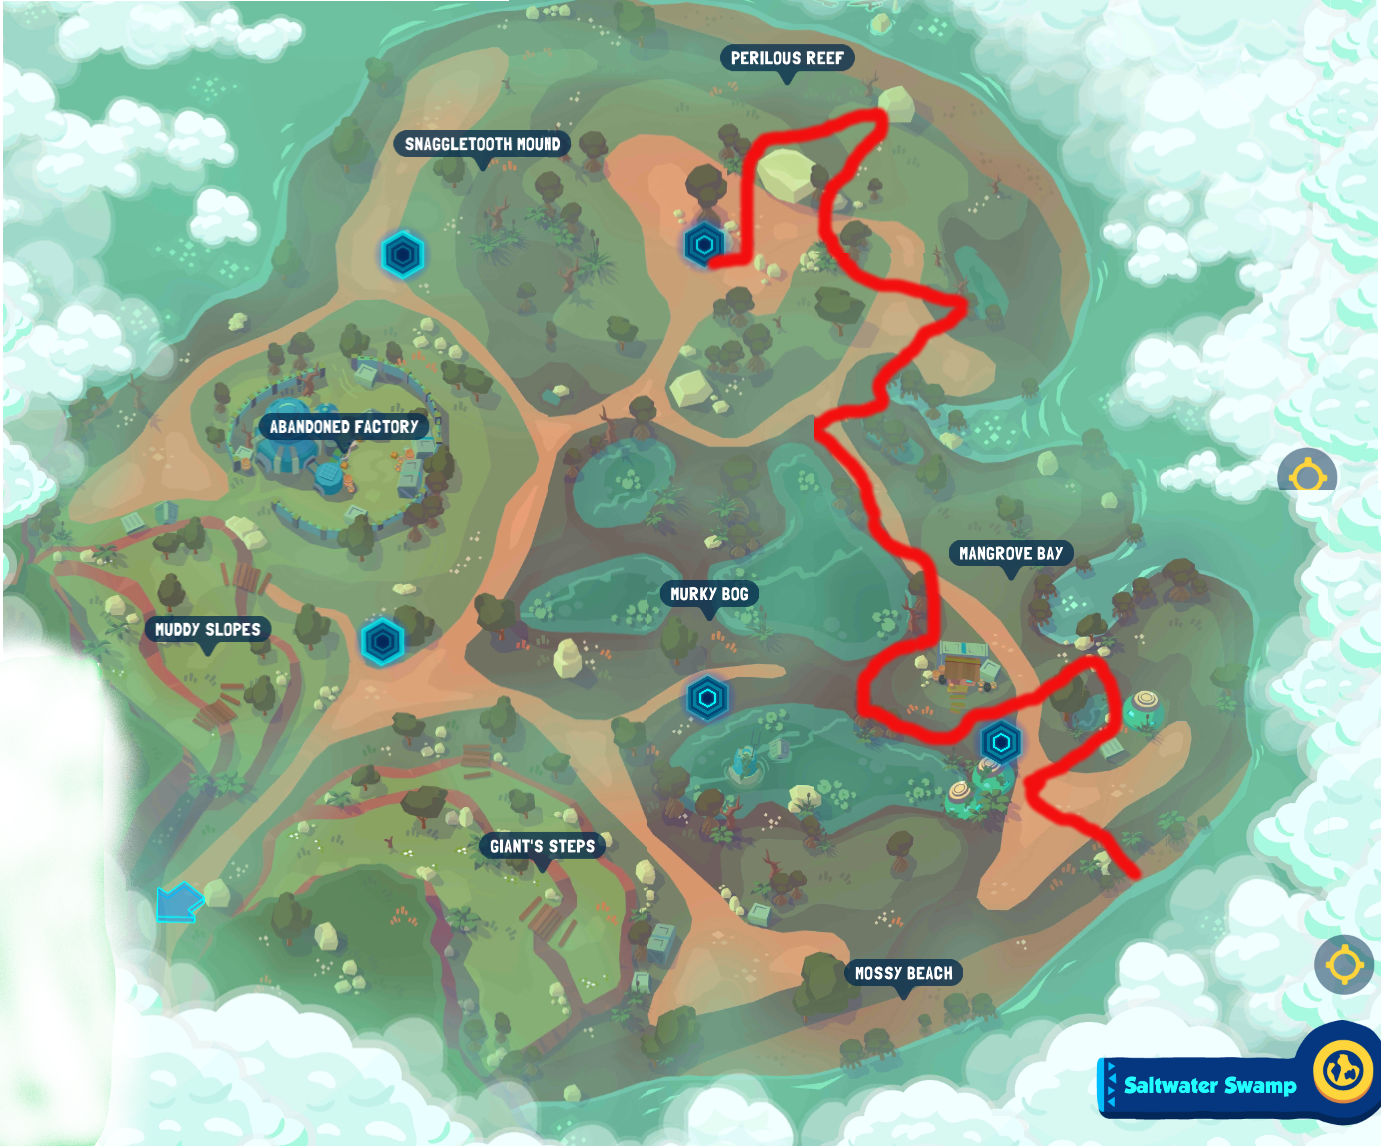
- Trees, Water, Bandits, Mines, Critters
- Drops: Evader, Splasher
109 gold/can, 38 gold/min, 3m/run
Strange Monument + Grand Fissure
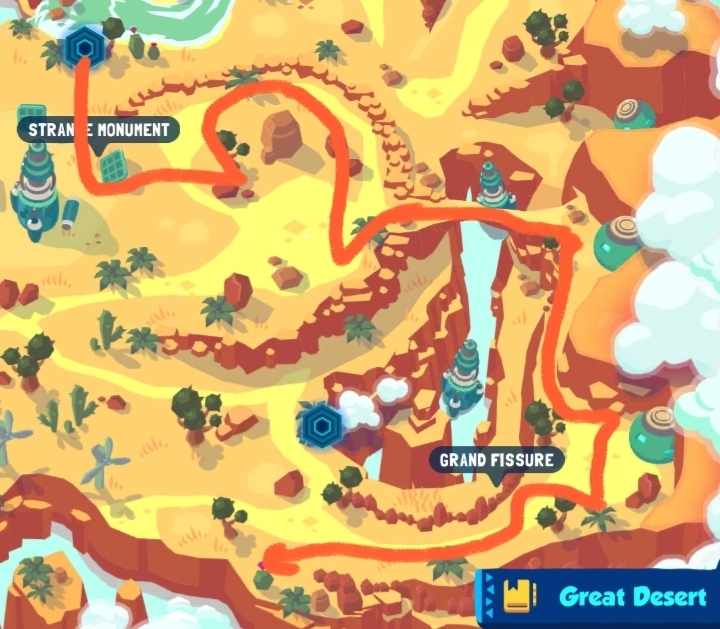
- Ancient Ruins, High Ground, Trees, Bandits, Wild Bots, Mines
- Drops: Tanker, Chaser Cores, Splasher
70 gold/can, 26 gold/min, 2min30/run
- Credit: @Terranova360#0208
- Run logs archive on Discord
Redleaf Ridge
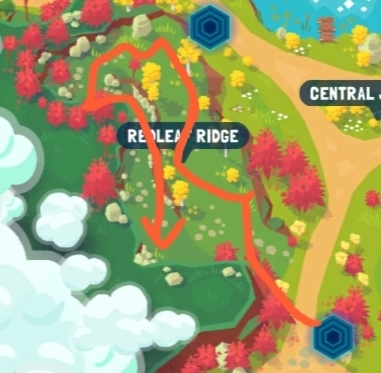
- High grounds, Trees, Bandits, Wild bots
- Drops: Tanker, Splasher
62 gold/can, 24 gold/min, 2min30/run
Other Routes
This routes are generally outclassed by the ones above. That is, in most cases, but if you are in a specific situation and you could use some more options, here they are!
- the values presented here are rough average of series of runs
- the recorded time includes loading times in/out of the area
- Run logs archive on Discord
Scrapeyard Speed Chests
- Special Chests, Ancient Ruin, Water, Wild bots, Bandits
- Drops: 2-4 special chests, so lots of mats randomly
2min/chest, 25-50 gold/min, 2-6min/run
- Note: obviously costs you a DZ trip.
- Demo: 5min 4 Special Chests
Dragon’s Ridge

- High Places, Bandits, ..?
- Drops: Tank Platings, ..?
- Credit: cmoi
83 gold/can, 30 gold/min, 2min45/run
Cobblestone Trail + River Run + Southbank
- Trees, Water, Bandits, Wild bots
- Drops: Evader, Splasher (lots of them)
76 gold/can, 17 gold/min, 4min30/run
- Loot piles at River Run, back and through the bandit Camp looting as you go, and along the shore to loot piles again.
- note: can be done with lesser recruits made up for by dodging
Giant’s Step by @foocker#2431
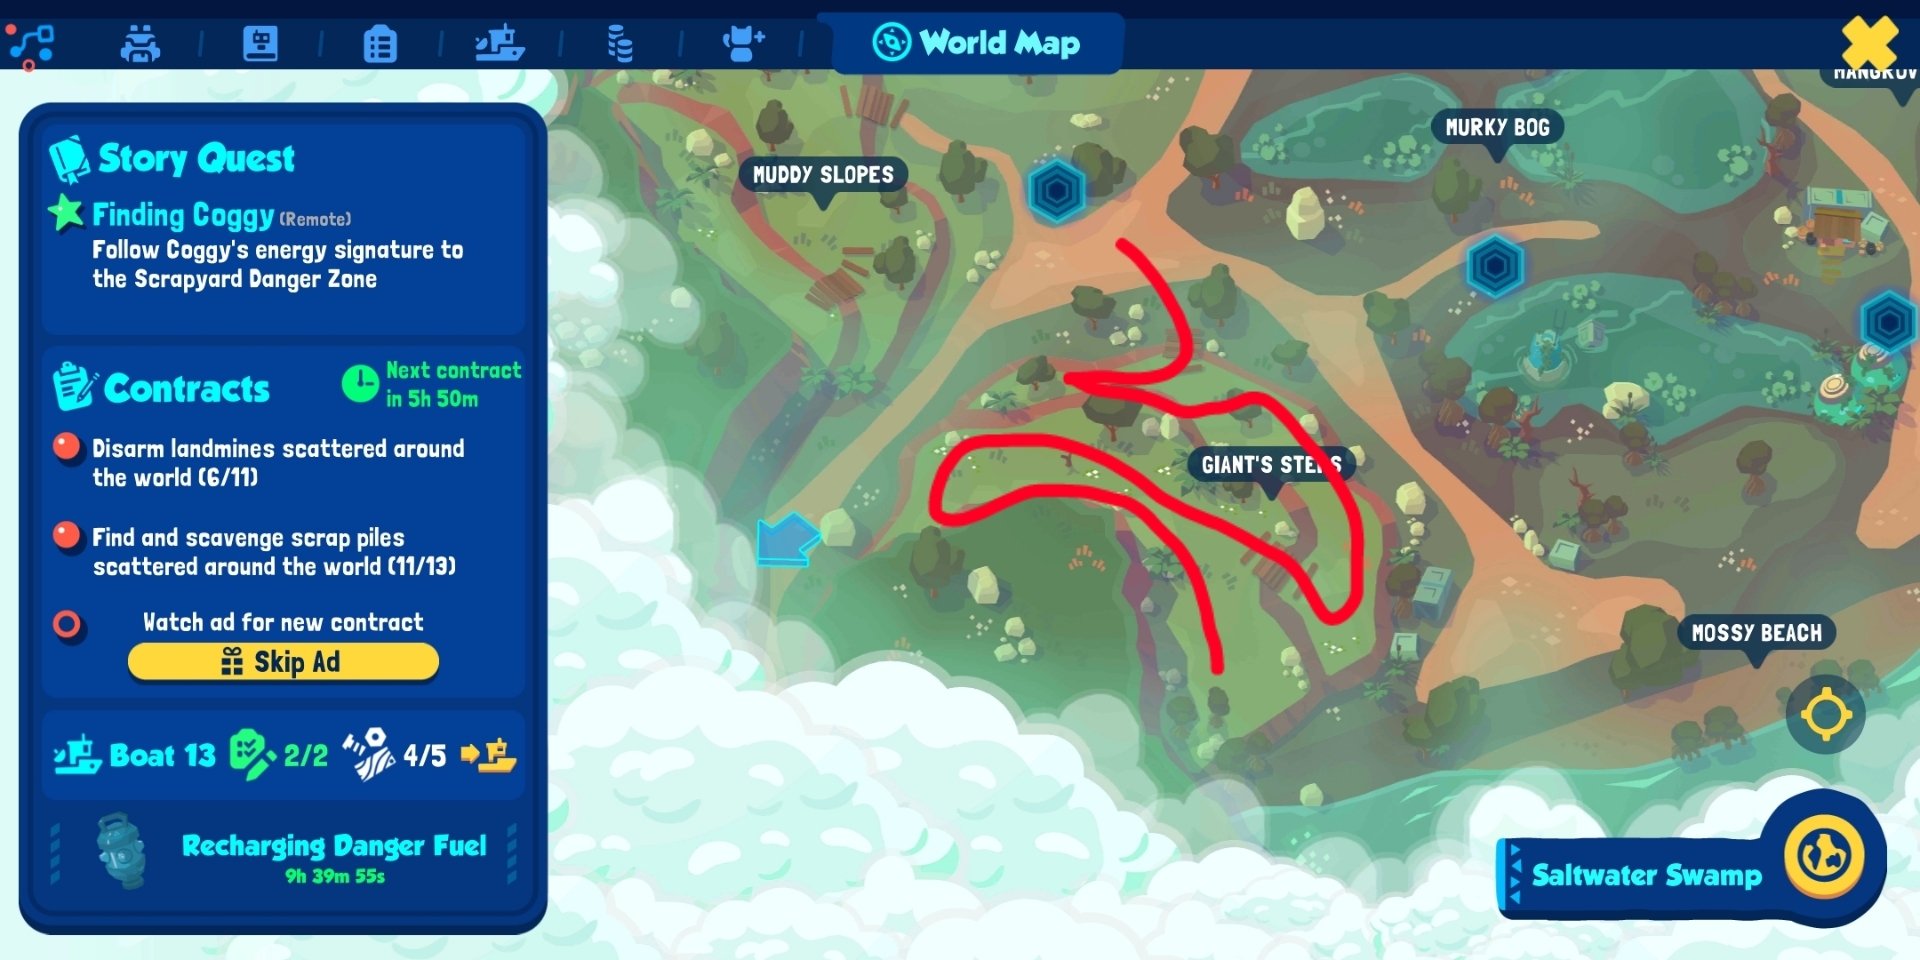
- High ground, Bandits, Wild bots, Critters
- Drops: tank and brawler
63 gold/run, 21gold/min, 3min/run
- note: critters really easy to catch here, with so many toads and snakes
- Discord post with demo clip
Crater Dome
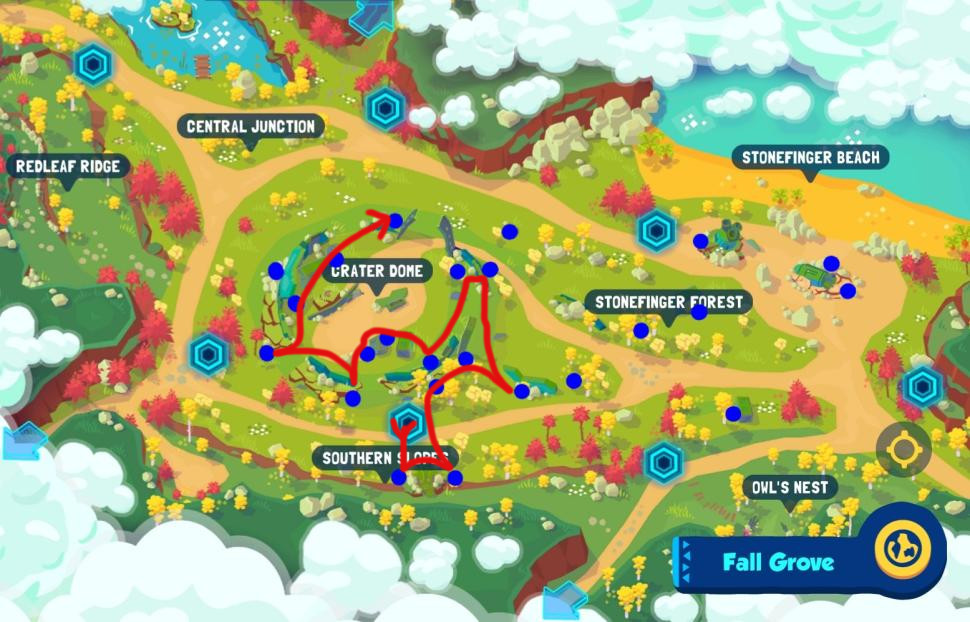
- Ancient Ruins, Trees, Bandits, Wild bots
- Drops: Chaser, Splasher, Heavy Steel
50 gold/run, 13 gold/min, 3min/run
Croaking Lake
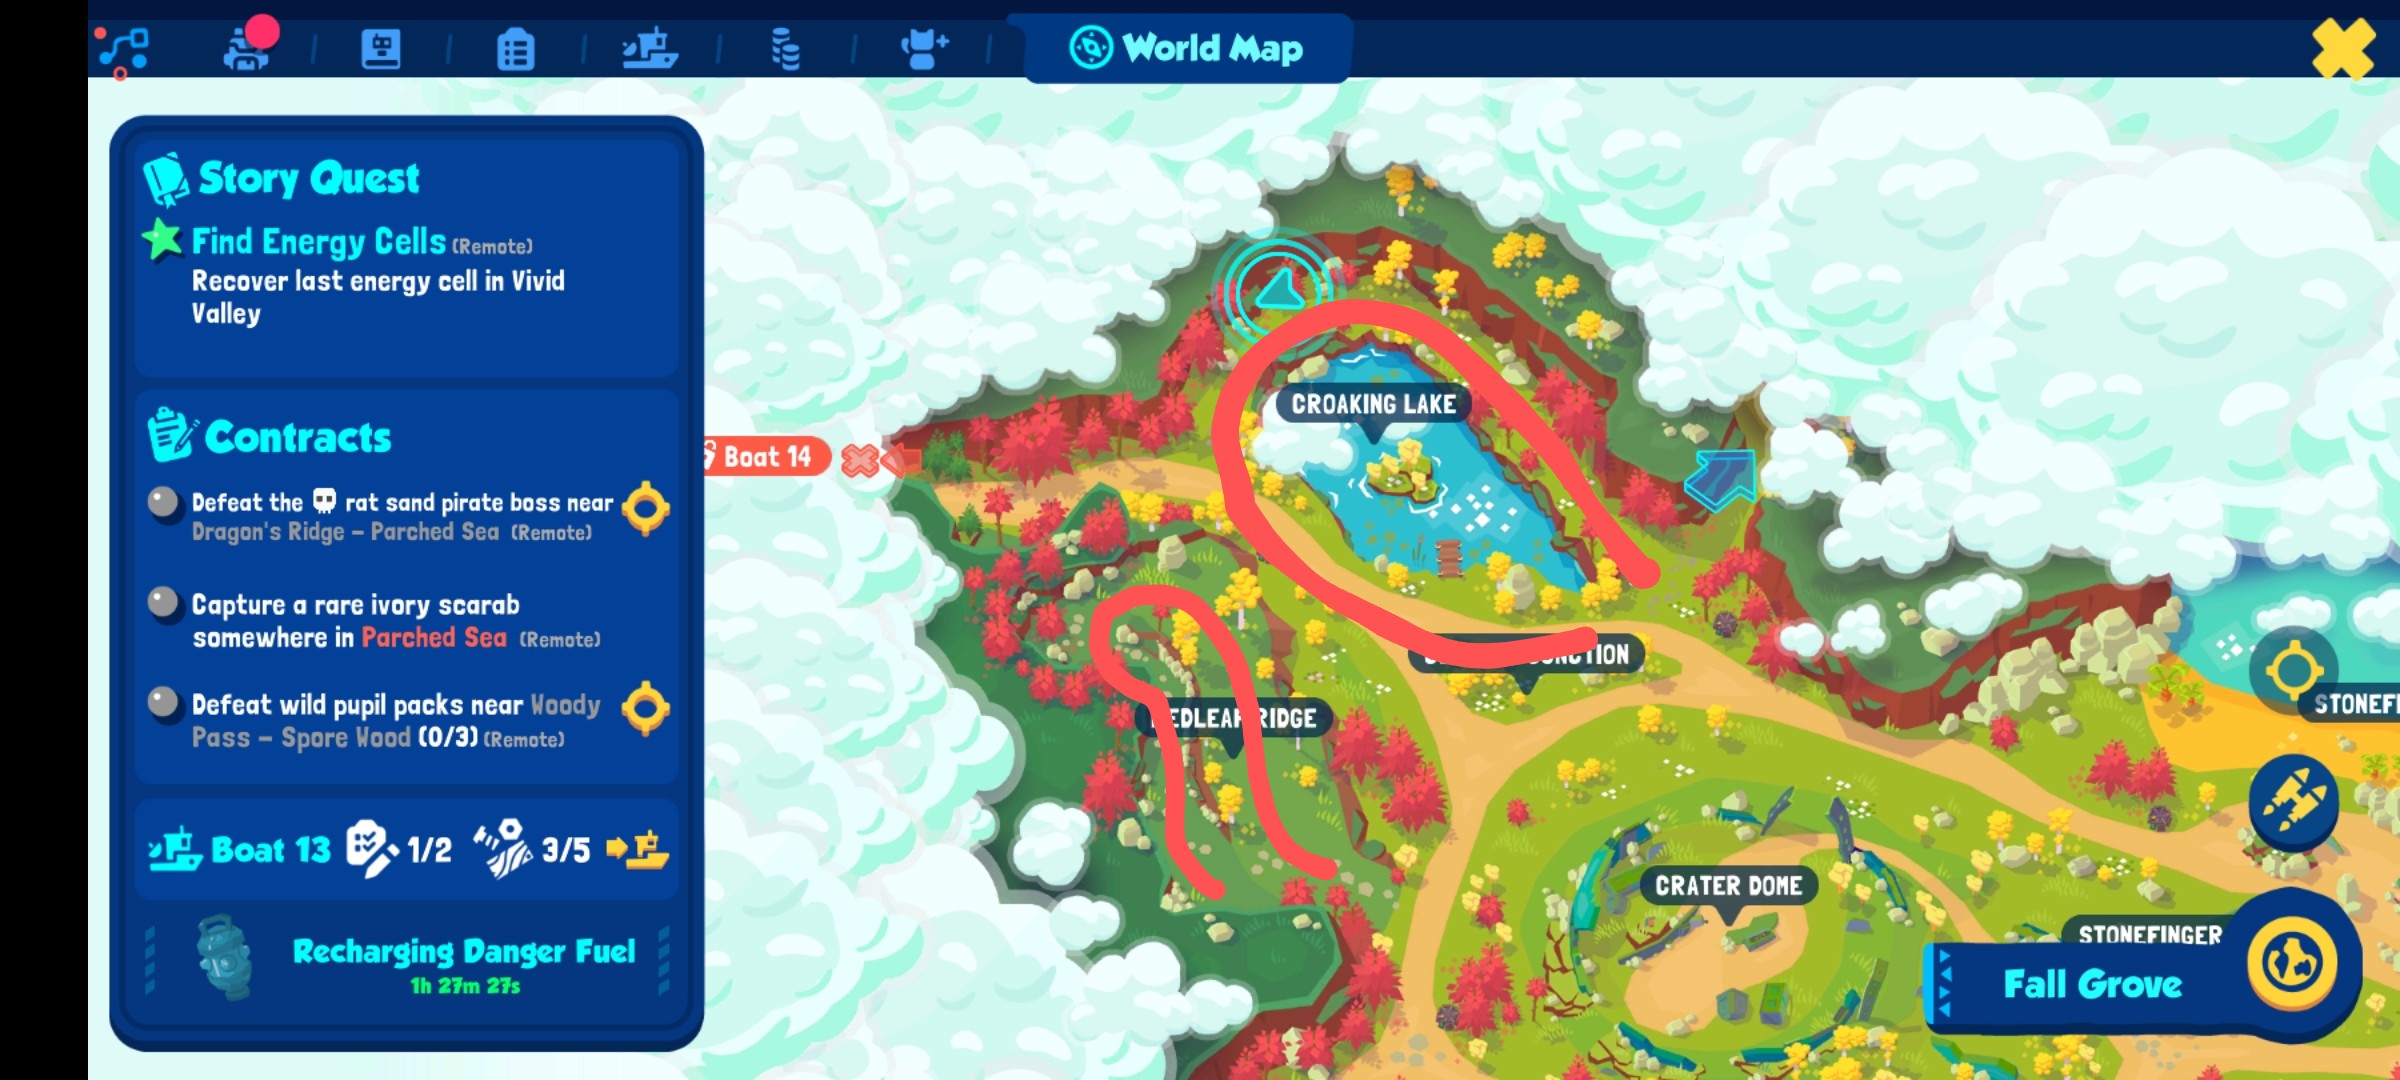
- Water, Trees, Bandits, Wild bots, Mines
- Drops: Evader, Splasher (lots of them)
70 gold/can, 25 gold/min, 3min/run
- Circle the lake: up left down right back close to the landing pad.
- note: can complete all types of contracts in a single location
Strange Monument
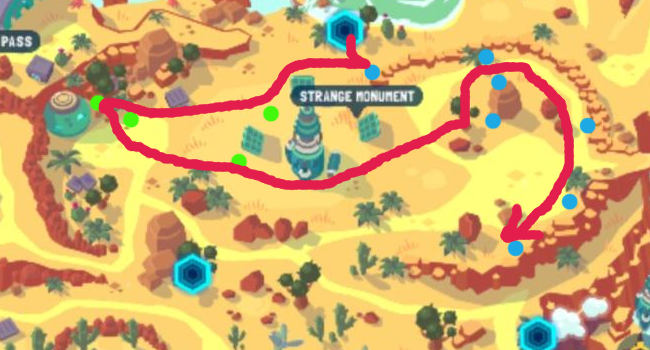
- Ancient Ruins, Bandits, Wild bots, Mine
43 gold/can, 18 gold/min, 2min30/run
- note: Crater Dome seems superior in every way if you have access to it.